How to Trim Beef Brisket: A Grill Master’s Guide
Brisket is the defining dish of Texas BBQ, a holy grail of sorts that smoking savants spend years mastering. Cooking such a dense cut of beef is an art form featuring equal parts heat, smoke, and patience, with a matter of minutes separating the blissful bites we all crave from chewy, dry meat that’ll get you run off the ranch. But even if you seek out knowledge from the masters (you’re in the right place!) and practice until it’s second nature, your journey to become a beef boss won’t be complete until you learn how to trim a brisket as well as you smoke it.
We knew just the person to bring in for such a tutorial: Kelsey Heidkamp, a certified Weber Grill Master with literally thousands of hours of culinary instruction and recipe development under her BBQ belt. Kelsey’s technique applies to all briskets, not just Wagyu, and is the crucial first step for nailing her backyard BBQ brisket recipe. Why risk it for the brisket when you can learn from a master?

What Is Whole Packer Brisket?
For starters, brisket is essentially the collection of pectoral muscles near the breastbone of cattle. Each packer-cut brisket is made of 2 muscles: the flat (which is long, thin, and lean) and the point (which is knobby, thick, and fatty). A whole packer brisket includes both the flat and the point and comes untrimmed with an even fat cap on top. The “top” or “fat side” of the brisket is the side covered in the thick, white fat cap, while the “bottom” or “meat side” has visible meat and a thin layer of silver skin membrane. This is a true Texas-style brisket, unlike the heavily trimmed flat meat typically sold in stores.
Whole packer brisket can be a bit cumbersome and is on the heavier end of common cuts; briskets like the one Kelsey used weigh between 10 and 14 lbs. They’re perfect for a family feast or, as Kelsey demonstrates, a quick set of bicep curls to make up for those incoming calories. Though it’s possible to purchase the flat and the point separately — today we’re focusing on trimming a whole packer brisket.
Trimming a Brisket
A properly trimmed brisket is not only a beautifully shaped cut of meat, but also one primed to let smoke and seasoning bring out its awesome flavor potential. The main goal is to cut away most of the fat cap, which comes too thick to fully render in the low-and-slow smoking temperatures every brisket needs to become tender. If you don’t trim the fat cap, you’ll be left with big mouthfuls of fat that’ll have to be sliced off after the cook anyway. Additionally, a full fat cap will increase cook time and block flavorful smoke and seasoning from binding to the meat. Putting in extra hours of work and patience for a brisket that comes out bland? No thanks!
While trimming a backyard brisket might seem intimidating at first, it’s actually a fairly quick and painless process. It’ll certainly take some practice before you have it down, but you can rest easy with a professional instructor like Kelsey showing you the ropes. Always remember that we’re going after only the hard fat; your brisket will also have plenty of soft fat that renders when cooked, so leaving that undisturbed is a must for moist brisket.
Prep Your Brisket Straight out the Fridge
The colder your brisket is at prep time, the easier it’ll be to trim. Softer fat actually begins to melt in hot temperatures, creating a soggy and slippery obstacle to your knifework. We filmed Kelsey’s guide to brisket trimming on a late July day in Louisiana; it didn’t take long for the lower layers of fat to begin rendering down in severe humidity and heat indexes approaching 110°F. Though your brisket may never experience such extreme conditions, Kelsey will be the first one to tell you that you should “get it out of your fridge, and get at it right away.”

Trim the Bottom Brisket Fat Cap
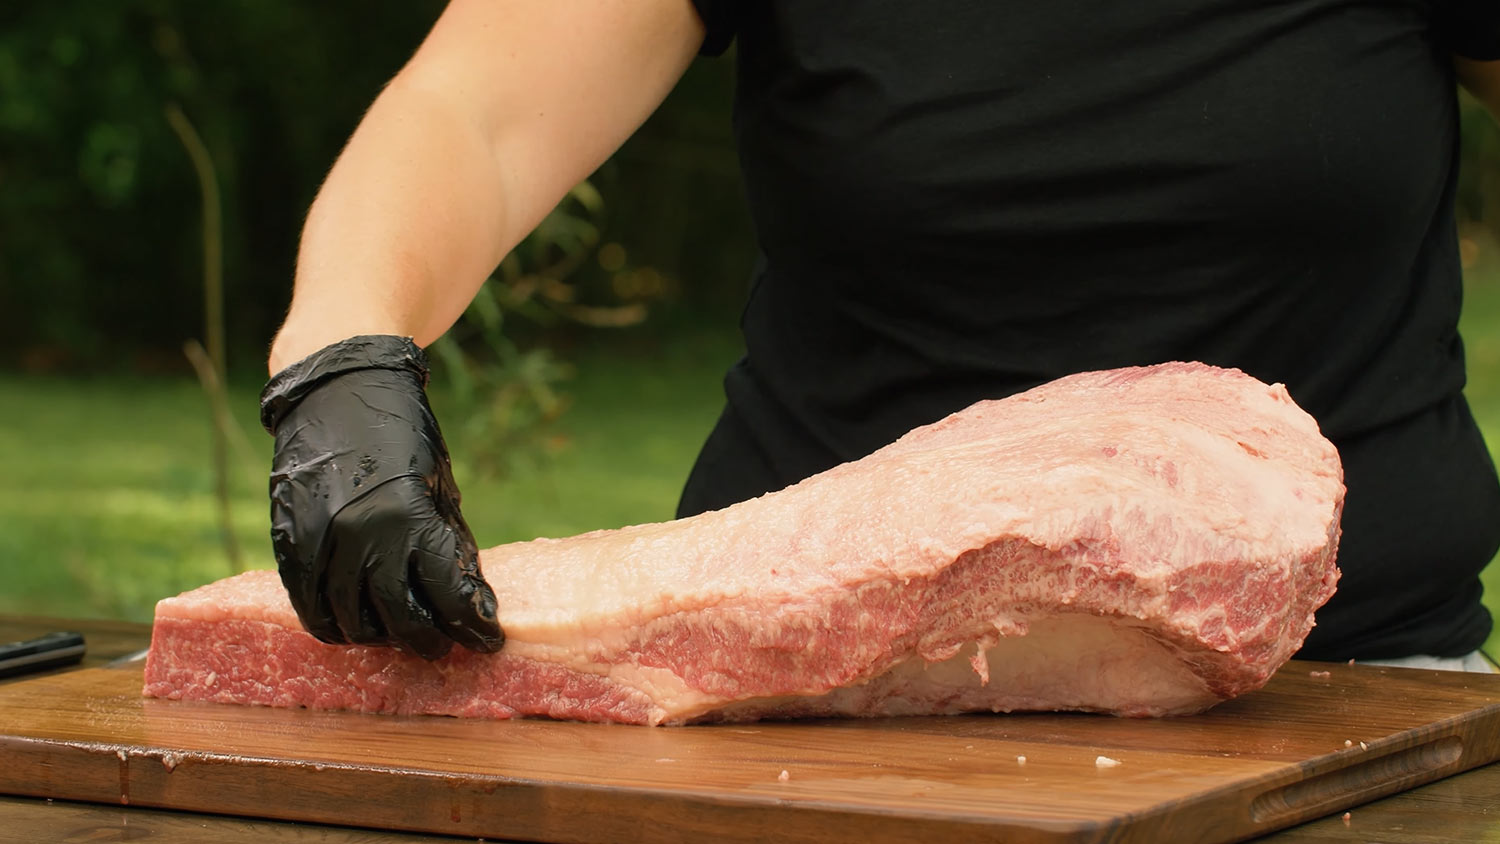
With gloves on, unwrap your glistening brisket and place the “top” fat cap side down on a sturdy cutting board or other work surface. On one side of the brisket flat, you’ll notice the fat cap wrapping up and onto the fleshy “bottom” portion of the meat that’s facing upward. This is the fat content that has to go.
Kelsey recommends using a boning knife, a filet knife, or any other blade that “has a little bit of flex to it” to slowly carve chunks out of the fat cap. Making shallow cuts almost parallel to the brisket, carefully slice in a sawing motion while using your off hand to peel back the chunks as you go. It’s important that you avoid trying to take out the entire fat cap in one stroke; your knife probably can’t handle the weight, and you’re not trying to get rid of all of it (more on that in a bit). Carve in layers, discarding this solid fat that’s too hard to render down.

Remove the Brisket Silver Skin
Turn your attention from the fat cap to the fleshy portion of the brisket. It’ll be covered in a layer of silver skin, a thin membrane of connective tissue that gets tough and chewy when cooked. Slide the tip of your knife between the silver skin and meat, then glide the knife along the membrane while pulling it away with your off hand. If you carve off a bit of meat while trimming the brisket’s silver skin, that’s totally fine! It’ll be worth not having to contend with the chewy membrane once the cook is done.
As for the flecks of fat lining the bottom of the brisket? That’s just the plentiful intramuscular fat, or marbling, for which Wagyu is so coveted. Leave the marbling as is — unlike the thick, hard fat cap, intramuscular fat will render during the smoke session to distribute flavorful moisture throughout the brisket. Non-Wagyu briskets have less marbling, but you’ll still be able to notice it. Once you’ve trimmed the silver skin and admired the marbling, you’re done with the meat side!

Trim the Brisket Flat Fat Cap
Flip the brisket to the top side (are you feeling a bicep pump yet?) and take stock of the fat cap. You’ll see it covers the entire brisket from flat to point, so it shouldn’t come as a surprise that this is the most work-intensive step of the whole process. If you feel the need, take a minute to reset — roll those shoulders, flex those fingers, offer up a quiet thank-you to the grill gods for blessing you with such a beautiful piece of meat. When you’re ready, grab that knife and get back to it!
The all-encompassing fat cap may look like a steep mountain to climb, but you shouldn’t start hacking away blindly without a game plan. With the flat end facing you, begin your trim by cutting a line down the right side of the flat, about ⅛” thick. Removing the outer fat here exposes the flat meat, which you can then use as a guide when trimming the top of the fat cap to the desired thickness. Depending on the quality of the packaging from your brisket supplier, this side strip might also be browned from oxidation, so it’s usually in your best interest to remove it for appearances.

Trim the Fat in Layers
With the exposed flat meat facing you, trim the top fat cap in layers. Use the same technique described for the bottom fat cap, holding the knife parallel to the meat and making a sawing motion from the point end to the flat end. Move slowly from one side of the hard, white fat cap to the other, taking off a strip at a time before discarding the trimmed hard fat. Note that the visible fat cap doesn’t run the entire width of the flat; stop trimming where the fat takes on a pink, fleshy color and feels almost pillowy-soft. As you go, keep an eye on how close you’re getting to the exposed meat, aiming to leave about ¼” of fat cap on top — this thickness will permit seasoning and smoke to enter the meat while also forming tasty brisket bark.
“The reason we leave about ¼” is this smokes overnight, over a long cook time,” Kelsey says. “The intramuscular fat is going to render down and liquify, but this stuff will get a little bit gelatinous and get that nice bark on it. And that’s with every bite: you get that little crispy bark on the top, and then that tender meatiness from the actual meat. It’s just great.”
Aim for an Even Trim
Repeat this process across the entire flat until the whole fat cap is about ¼” thick. If you trim a little too closely, Kelsey says there’s no need to panic. “It happens, especially as you’re experimenting and trying and trimming your first brisket. It’s not the end of the world. But the goal here is to leave as much fat in an even layer on this top fat cap here.” In that same vein, it’s acceptable to remove additional side fat to expose more of the meat to better guide your trim. Kelsey did it, and she’s a certified Weber Grill Master! Hang on to any closer cuts that contain soft fat and strips of meat; you can grind them to make burger patties or sausage links.
Round off the Brisket Edges
Kelsey likes to smooth the edges to give the brisket a more uniform shape and size, so start making your way around the brisket with an eye for the corners and edges. Cut off any flimsy, clumpy, or oddly shaped pieces of soft fat overhanging the sides, which will burn as they cook anyway. Again, it’s fine if you trim a little too closely and cut away some meat as well. These thin strips are good fodder for burgers or sausages, so hang onto them if you’re the no-waste type.

Trim Any Fat Cap You Find
As you shave back the edges of the brisket, odds are you’ll reveal more fat cap, particularly on the untrimmed side of the flat. Use the same trimming technique we outlined above: slow, sawing cuts parallel to the fat cap, pulling the pieces back and away from the brisket as you go. Remember to feel the white fat to determine whether it’s hard or soft, and continue trimming in strips until the hard stuff has been cleared. “Once it gets pillowy, and you can feel it with your fingers,” Kelsey says, “that’s what you’re going for.”
Trim the Loose Point Fat
Move up the brisket to the point, where you’ll almost certainly find a limp clump of fat on one side. It resembles soggy skin on a chicken wing, the kind of fat that won’t do much of anything when cooked. Grab it with your off hand, pull it up from the brisket, and use that trusty sawing motion to remove. You may find a similar fatty clump on the far end of the point. Remove that with the same technique, discarding or keeping the trimmings depending on how much meat was in the cut.

Shape the Brisket Point
Now take stock of how the point is shaped. Your sporadic trimmings likely left it a little uneven, which isn’t a big deal if presentation doesn’t matter to you. But Kelsey prefers the point to be evenly shaped and leveled, which should require only a handful of extra cuts in this area. While you’re here, feel around for any hard fat cap you may have missed during earlier inspections. The far end of the point that faces outward is an easily forgotten spot.

Trim the Layer of Fat Between the Brisket Flat & Point
Throughout the previous steps, you might have noticed a layer of fat in between the point and the flat. (If not, follow the line of white fat that runs across the top of the point.) An aggressive restaurant or competition brisket trim typically calls for most of this fat layer to be carved out, turning the outside of the point into a flap of meat. Pitmasters take this approach so they can apply seasoning directly on the meat’s surface and to better expose the “beauty slices” for judges or diners. For the purposes of Kelsey’s backyard brisket trim, however, we recommend removing only the outermost layers of hard fat to shape your brisket. Some of the hard fat between the meat won’t render and will need to be cut out later, but it does some serious work while your brisket is in the smoker.
“What it’s gonna do is help keep the flat muscle, which is the leaner muscle, moist because all that fat will be rendering and melting,” Kelsey says. “That’s really why I like cooking this as a whole packer cut. Some people will separate it completely and cook the flat separate from the point. I like keeping it whole because over the 15 hours, that’s a long time for it sitting on a grill. That fat, again, will help keep that leaner muscle moist and tender.”
Digging out the fat layer not only removes a source of moisture from the cook, but also alters the structure of the brisket you’ve worked so hard to shape. What’s more, it’ll inevitably result in a smaller cut of meat, which isn’t ideal for a Texas-style smoked brisket meant to feed a crowd. “For backyard BBQ, we want to keep as much meat on there as we can,” Kelsey says, before rightfully adding, “and this is Wagyu, so I try not to take off too much.”
If you want to experiment with cutting out more of the central fat layer, attack it like you would any other section of fat cap. Make your first few cuts into the fat at an angle until you can hold the knife parallel with the brisket, then employ those slow, saw-like slices until you’ve cleared away the desired amount of fat.

Perform a Final Brisket Check
At this point, the majority of your work is done! But brisket takes time to reach perfection, so another few minutes spent double-checking your handiwork is worthwhile. Give every part of the brisket a look and a feel, staying vigilant for the hard fat in need of trimming and meaty areas that could be shaped more to your liking. Remember to flip it over and see if there’s any work left to be done on the bottom side as well. Every brisket will have a slightly different composition, so it all comes down to your sensibilities.
How-To Guide
Final Inspection Checklist
- No silver skin on the bottom portion of the flat
- A ¼”-thick fat cap covering the flat
- No loose clumps of fat overhanging the meat
- Rounded off edges and a fairly uniform overall shape
You’re Ready to Smoke Your Brisket
Congratulations, you just learned how to trim a whole brisket like a pro! This is the stuff Master Grillabilities is made of, so go ahead and pat yourself on the back for taking your BBQ skills to the next level. While you’re mastering new techniques, why not give Kelsey’s smoked backyard brisket recipe a try? With the brisket-trimming skills you picked up today, you’re already a few steps ahead of the game!