8 Tips When Building an Outdoor Kitchen
Building an outdoor kitchen, are we? Envisioning parties to prepare, cookouts to come, and excitement to ignite? Truly, it’s an experience that can run the full gamut from exhilarating to daunting — too often, it’ll even ping back and forth with blatant disregard to your sanity. This isn’t news to our outdoor living experts, especially after over 20 years spent guiding customers like you to their very own holy grail of grilling.
It’s that spirit that drives us here at BBQGuys®, striving hard to give you everything you need to be a grillmaster from the start… like our Outdoor Kitchen Checklist. From the first sketch to the final nail, we have your back every step of the way. That’s why we’ve called upon our outdoor living experts to give you their 8 best basic tips to bear in mind while planning any outdoor kitchen.
Follow These Tips for Building an Outdoor Kitchen

Get an Insulated Grill Jacket if Building with Combustible Materials
Every outdoor kitchen built with combustible materials (treated or not) requires an insulated grill jacket installed around the grill. They protect your grill's undercarriage from weathering and corrosion, helping them last longer. They also halt burning or warping damage to your surrounding BBQ island as a result of those piping-hot temperatures. An insulated grill jacket, frankly, is insurance that lasts for many years of cookouts. Note that jackets are proprietary, and not all brands offer one. For more info, check out our Insulated Grill Jacket Buying Guide. Shop Insulated Grill Jackets
Properly Ventilate Your Outdoor Kitchen with Vent Panels
Choosing gas? Use a licensed contractor to ensure that your outdoor kitchen has proper ventilation. You really don’t want to mess around with avoidable gas leaks and build-ups (read: “explosions just itching to happen”). When it comes to venting, placement is everything. Install BBQ island vent panels every 4–6 feet to prevent build-up. Since natural gas rises, place vent panels as high as possible for these installations; the opposite is true for propane gas, which sinks. For more info, check out our Outdoor Kitchen Ventilation Buying Guide. Shop BBQ Island Vent Panels
Enclosed Storage May Not Work Under a Sink or Grill
While it’s convenient to install stainless steel cabinets, doors, and drawers throughout your outdoor kitchen island, first account for the placement of your grill or sink when deciding whether or not to purchase enclosed cabinetry. Many outdoor kitchen owners bought enclosed cabinets to install beneath their sink or under a gas grill, only to realize that a pesky plumbing or gas line is right in the way. Who needs that headache? Shop Outdoor Kitchen Cabinets & Storage
Outdoor-Rated Refrigeration is Your Best Choice
Outdoor rated appliances are weather-resistant and built to handle hardier climates, sudden swings in temperature, and the elements. To ensure you purchase models rated by the manufacturer for outdoor use, look for a UL certification. Underwriters Laboratories is one of the most trusted certification companies in the world and performs rigorous testing in outdoor conditions. Other certifications to look out for are CSA Certified Products (Canadian Standards Association) or ETL Certified Products (Intertek). Shop UL Certified Outdoor Refrigeration
Avoid Installing Cooking and Cooling Appliances Next to One Another
Did you know an outdoor kitchen has 4 main zones? The prep zone, cooking zone, plate-and-serve zone and entertainment zone each has a specifc purpose and should contain related products. No matter where you place your appliances, leave at least 1 foot between your refrigeration units and any grills or side burners. This keeps your appliances happy, ensuring that they can properly ventilate and last longer. Learn More About Outdoor Kitchen Zones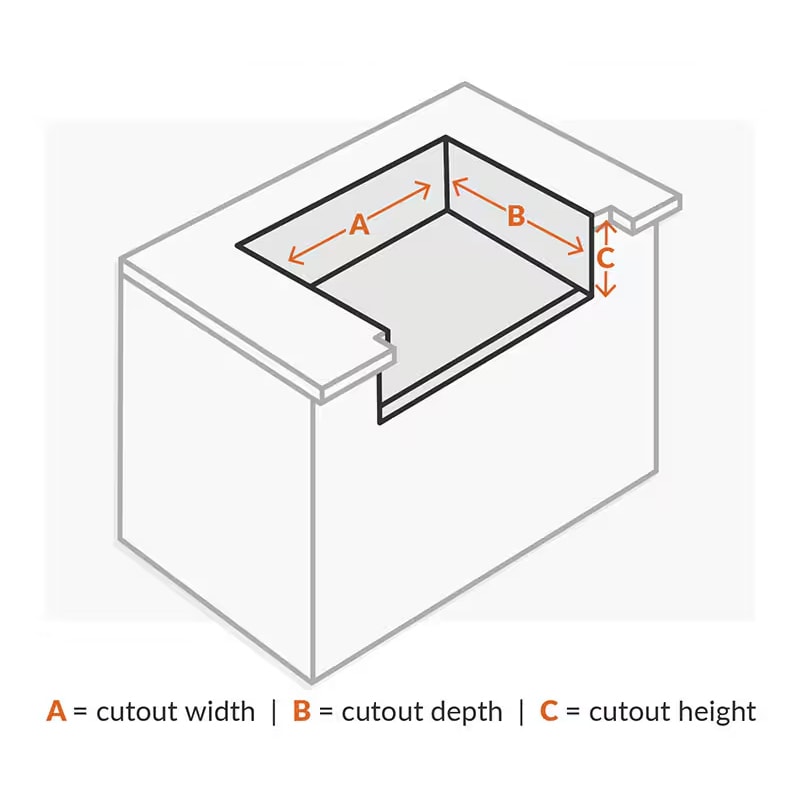
Learn Those Cutout Dimensions Before You Cut
Measure twice, cut once.The last thing you want is to prepare to install outdoor kitchen appliances by cutting out the space in your countertop, only to realize later that they’re off the mark. Before getting started, it’s important to check and double-check your owner’s manual for your grill and unfinished island and follow all manufacturer’s instructions. This is especially crucial for clearance to combustibles and ensuring that you won’t void any warranties. Learn How to Measure the Cutout for a Built-In Grill

No Such Thing as Too Much Counter Space
Half the fun of any new outdoor kitchen is filling it with outdoor appliances, but in the excitement many clients forget the importance of empty counter space. Where else will you prepare and serve food or keep utensils in reach? You'll want to leave ample counter space for easy and convenient cooking while planning that patio paradise. Not sure how much counterspace is enough? Learn your outdoor kitchen options based on space. Learn More About Outdoor Kitchen Countertops
Our Experts Can Help You Plan
Planning a kitchen is thrilling — but we know the process can also be overwhelming. Our in-house design team is here to help you create your out-of-house living space. With decades of product knowledge and exterior design experience, our experts will work with you to develop a completely customized outdoor kitchen plan. That includes a free, personalized 3D rendering to ensure everything is safe and suited to your style and functional needs. Free Outdoor Kitchen 3D Design ServiceBuilding an outdoor kitchen is an exciting investment, but thoughtful planning is what turns a good design into a great one. From proper ventilation and appliance placement to selecting outdoor-rated products and allowing enough workspace, every detail plays a role in the safety, functionality, and longevity of your setup. By keeping these considerations in mind before construction begins, you can avoid costly mistakes and create an outdoor cooking space that performs as beautifully as it looks. Still have questions? Call 1-877-743-2269 and grill our outdoor kitchen experts. We want your investment to satisfy you for many, many happy cookouts to come.
