Outdoor Kitchen Layouts & Designs | Our Experts Help You Plan
When you gaze out at your backyard or patio and dream of the outdoor kitchen that’ll soon stand there, it’s easy to get overwhelmed by the possibilities. Speculating about building your perfect outdoor space might be fun for a little while, but you’ll eventually have to start making some concrete decisions. When that time comes, it’ll help to know a thing or two about barbecue island layouts and how to design an outdoor kitchen. With the help of our outdoor kitchen design experts, this handy guide will cover everything you need to know about work zones and the different types of grill islands.
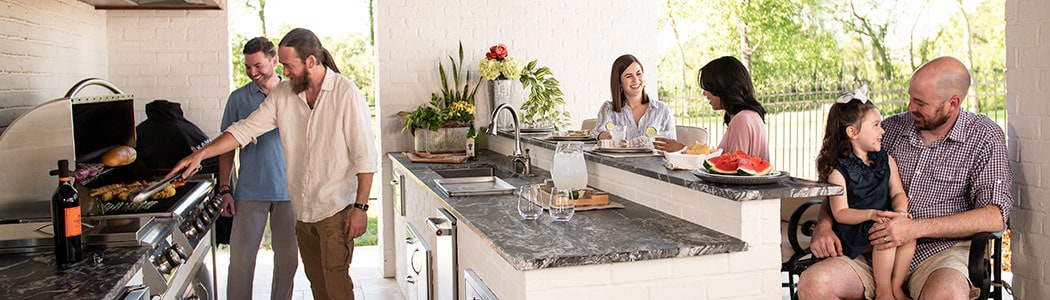
Planning Outdoor Kitchen Zones
Indoor kitchen designers often talk about the work triangle. This is the idea that a kitchen’s 3 main workspaces—the cooktop, sink, and fridge—should form a triangle. Maintaining a natural and unobstructed flow between each point of the work triangle makes cooking much easier and more efficient, so indoor kitchens are often laid out in service of the triangle.
Outdoor kitchens, however, feature 4 main workspaces instead of 3, which turns the workspace into more of a square. But the same idea of creating a natural flow for cooking and entertaining still applies. We refer to these outdoor kitchen areas as the cooking, prep, plate-and-serve, and entertainment zones. You don’t have to deck out each outdoor kitchen zone with components and appliances, but they’re good to keep in mind as you plan your layout. With functionality, convenience, and safety in mind, let’s take a look at the 4 different outdoor kitchen zones.
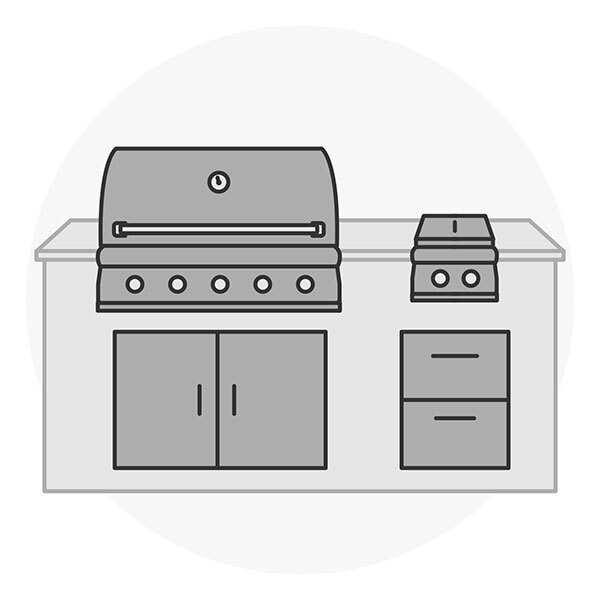
Cooking Zone
The main attraction and focal point of most kitchen island layouts, the cooking zone houses built-in grills, smokers, side burners, griddles, and even pizza ovens. It should also include room for doors and drawers that both provide access to gas lines and store all of your grilling utensils. Propane grillers benefit from a propane tank bin to keep unsightly fuel cylinders tucked away, and regardless of gas type, your cooking zone must have proper outdoor kitchen ventilation to properly protect your island and clear your space of potentially harmful fumes.

Prep Zone
Your prep zone can be a simple area of open counter space, but you should at least consider including a sink. Without one, you’ll be making several trips inside to wash veggies and then dishes after dinner. The convenience only increases with the addition of outdoor kitchen storage components and cabinetry like roll-out trash bins, paper towel holders, cutting boards, and dry storage. No matter how big you go with your prep zone, it should be adjacent to the cooking zone to improve overall efficiency.

Plate-and-Serve Zone
While planning how to use your space, keep in mind that those burgers coming off the grill are going to need some place to go. That’s the role of the plate-and-serve zone, which prevents hungry guests from crowding around the hot grill and makes the lunch line run much smoother. A stretch of open counter space where you can lay out a serving tray and stack of plates is often enough, but a warming drawer can really come in handy if you’re cooking food in multiple batches for a large group of family and friends.

Entertainment Zone
This zone is home to outdoor bar equipment and refrigeration appliances like beverage fridges, ice makers, wine coolers, and kegerators. In short, it’s where your guests go when it’s time to have a good time. Keep in mind that there should be a buffer, whether it’s distance or insulation, between the entertainment and cooking zones. Heat from a grill positioned too closely will force refrigeration units to work much harder to stay chilled.
Outdoor Kitchen Island Options
Now that we’ve gone over the 4 main areas of most outdoor kitchens, it’s time to consider how you’d like them arranged. As always, your barbecue island planning will be unique to you based on your budget and how much space is available, but there are a few types of grill island layouts you should be familiar with as you start making choices.

Linear Barbecue Islands
Best for cost-conscious consumers and small spaces, linear islands have a smaller footprint while still serving as functional outdoor kitchens. They typically run along a side of the home (though they can be freestanding) and position the grill in the middle, with components and counter space on either side creating a central unit for simplicity. Because cooking and entertainment zones will be clustered on small linear islands, you may need to install insulation to create a buffer so appliances can operate efficiently. Linear islands are usually paired with a nearby dining table or outdoor seating set to establish a more complete space, but they can stand on their own just fine. This outdoor kitchen island shape is featured in our Secret Garden Outdoor Kitchen Gallery

Galley Islands
If a single structure simply isn’t enough, you might consider a galley layout. These are 2 linear islands that run parallel to each other, with an open space in the middle. This outdoor kitchen design is useful when multiple people are cooking at once, and workflow becomes much more efficient because you can turn around to reach a different zone instead of moving up and down a single island. The possibilities with galley islands are numerous. They can mirror each other, or you can dedicate one side to prep and cooking zones and the other to entertainment and plate-and-serve zones. We recommend spacing galley islands at least 3 feet apart, but you’ll need to make more room if you expect foot traffic while you’re grilling. This outdoor kitchen island shape is featured in our Rustic Poolside Paradise Gallery

L-Shaped Barbecue Islands
These are the most popular layouts, perhaps because the shape lends itself to a more creative design that can better support the concept of outdoor kitchen zones. These place your cooking and entertainment zones on opposite legs and give them all the cushion they need. L-shaped islands also help outdoor kitchens feel larger and slightly more enclosed, and even if the second leg is short, the added space means you can include more components. In fact, many of our customers who choose L-shaped islands do so after realizing a linear island can’t fit all the amenities they want. This also gives you the option to place bar stools along one side of the island. This outdoor kitchen island shape is featured in our Northshore Backyard Living Gallery

U-Shaped Outdoor Kitchens
U-shaped islands provide more space, more options, more creativity when it comes to both the number of components and location of work zones. While a fully stocked outdoor kitchen might be desirable, the true effect of U-shaped islands is that they create a cozy, naturally enclosed gathering place. Many homeowners with U-shaped outdoor kitchens reinforce this idea by lining every side with bar stools. Some have even begun adding a separate, small island at the opening of the “U” to make the space slightly more enclosed. This outdoor kitchen island shape is featured in our Patriotic Kitchen Gallery
Custom Islands
With shapes that vary from project to project, custom islands are tough to pin down. What you should know is that this includes any barbecue island that does not conform to one of the types we have previously outlined. While prefabricated island kits make it easy to DIY a conventional grill island, we strongly recommend working with a skilled and experienced contractor if you want a customized design. You should also be aware that, though eye-catching, shapes formed by odd angles will eat up linear space and can limit functionality. Unless your backyard has an abundance of open space, that might be more trouble than making a stylistic statement is worth.
Other Outdoor Kitchen Layout Details to Consider
At this point, all those backyard possibilities should be coming together. With a firm understanding of work zones and which grill island layout best fits your vision, you can move on to the next step of outdoor kitchen planning. There are still a few small details to consider that can further personalize your barbecue island layout.
Split-Level Countertops
A split-level countertop can completely transform a space, starting with the simple fact that a heightened sitting area places guests above the exhaust from your grill and allows you to have eye-to-eye conversations with them while you’re cooking. Opting for 2 distinct levels also creates a natural barrier between the prep area and dining area on the same countertop, which can eliminate the need for a separate dining table.
Foot Rails
Foot rails play a dual role in outdoor kitchen design—they enhance both the aesthetics and functionality of your space. These low horizontal bars, strategically placed along the base of your kitchen island, not only contribute to the overall design by providing a sleek and polished appearance but also serve a practical purpose. Guests can comfortably rest their feet on the rail while engaging in conversations or enjoying a drink, creating a relaxed and bar-like atmosphere.
Backsplash
The backsplash in your outdoor kitchen is more than just a protective barrier. This is an opportunity to bring your personal style into the design. As an exposed area, the backsplash is subjected to various weather conditions, so it is essential to choose materials that can withstand the elements while adding visual appeal.
If you have any questions about outdoor kitchen layouts, give our experts a call at (877) 743-2269. You should also look at our Outdoor Kitchen 3D Design Service to get help planning your zones, choosing your layout, and picking your appliances.
