If you, like us, were born to grill, then you know there’s nothing sweeter than a well-executed outdoor gathering. Whether you’re cooking for the family or treating your buddies to barbecue during the big game, it’s crucial to have a game plan to ensure your gathering is a win. It’s why our outdoor living experts have put their heads together to compile this list of tips and hard-earn lessons. Strap in as we tackle everything from preheating and pro-level cooking techniques to searing strategies and the importance of letting food rest. So, let’s get started.

Make a Game Plan
Do you think pro athletes enter a game without first envisioning how everything would play out? Not a chance. By that same token, the last thing you should be doing in the heat of the moment on the day of the barbecue is scrambling to decide which side dishes to cook or how to season your meat. That’s why you should take some time beforehand to plan your cookout.While you’re thinking through the day, it doesn’t hurt to also prep food the night or even week before, if possible. And if you don’t mind letting teammates pitch in, consider assigning certain tasks or sides to guests so there’s less on your day-of plate (figuratively, of course). Setting yourself up for success is crucial—take it from us, the only time you should wing it around the grill is when chicken is on the menu. Shop Food Prep Tools

Don’t Forget to Warm Up
You wouldn’t jump out of bed and hit the gym without getting loose, would you? That’s a sure-fire way to hurt yourself. Well, same goes for grilling: if you don’t preheat your gas grill, you almost certainly won’t get the results you want. Food placed on grill grates that aren’t preheated is more likely to stick, less likely to form those gorgeous sear marks, and could even end up overcooked as the grill climbs to the desired temperature.Fortunately, it shouldn’t take more than 10–15 minutes of preheating on high to get your grill where it needs to be. Just remember to keep the lid closed so those high temperatures stay trapped inside the grill. Preheating really is as simple as it sounds, but it’s arguably the most important step of the grilling process. Shop Grill Thermometers

Get in the Zone(s)
When you’ve got a big barbecue going, odds you’re cooking multiple types of food at once. But how can you pull that off when different items require different temperatures and cook times? The answer is dual-zone grilling, a method that divides the grill into a direct-heat side and indirect-heat side. Grilling with dual zones allows you to sear steaks or burgers right over the flames while indirectly roasting veggies or more delicate items on the opposite end.To set up dual zones on a gas grill, just turn roughly half the burners to high heat and leave the other burners off or on low, depending on the cooking style you need. The more burners you have, the more zones you can create—and the more versatile your grill becomes. Who doesn’t love having more options at their disposal? Learn More About Dual-Zone Grilling

Throw a Flag on Flare-Ups
Fighting flare-ups is kind of like staring down a blitzing linebacker—you know it’ll happen at some point, but you can’t let it throw you off your game, especially while watching the game. Flare-ups occur when fat drips onto the heat source and ignites, creating out-of-control flames that can char food and turn into a runaway grease fire if unattended. Most gas grills have metal or ceramic flame tamers that lessen flare-ups, but sometimes those pesky flames pop up anyway.You can stop flare-ups in their tracks by shutting the lid, dousing the fire with salt or baking soda, or moving food from direct heat to indirect heat. If a flare-up threatens to become a full-on grease fire, however, you should remove all food from the grill and shut off the burners. Just be sure to never use water on a gas grill flare-up. Shop Flame Tamers & Heat Shields

Dial up the Perfect Sear Marks
Who doesn’t love the beauty of the crosshatched pattern of perfect sear marks? Achieving those beautiful, flavorful lines isn’t as hard as it looks, and it all starts with a properly preheated grill. You want the grill to be roaring-hot, which may require up to 15–20 minutes of preheating on high, depending on the size and thickness of your grill grates.When food touches hot grates, you’ll hear a sizzle to let you know it’s beginning to caramelize and develop sear lines. After about 2 minutes (or when the food stops sticking), simply rotate it 45 degrees and let the grill do the rest. Flip over, repeat, and boom—perfect sear marks. A coating of oil or butter will aid in caramelization, which is a key to grilling the perfect steak. How to Get Perfect Sear Marks

Let Finished Food Take a Breather
Don’t dig in just yet! No matter how good the barbecue looks, you should wait before tasting the fruits of your labor. Not only will this allow food to cool to an edible temperature, but the juices will also have time to evenly redistribute and provide amazing flavor in every bite. Immediately slicing a steak will cause it to lose those precious juices, which would be a tragedy.A good rule of thumb is letting food that was cooked on high heat rest for 5 minutes per pound. You can experiment from there, but remember that the larger the piece of meat, the longer it typically needs to rest. However much time it takes, that’s the perfect window for you to soak in a quick ice bath (or, at least, enjoy nice cold drink)—it’s great for recovery after all that demanding work.
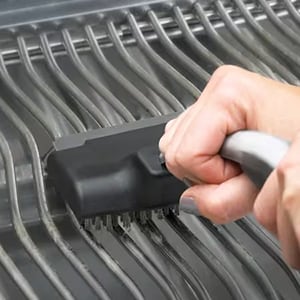
Clean the Playing Field
Before you hit the showers, your grill needs a cleaning of its own. Keeping a clean grill means you’ll be ready to jump right into the next barbecue, plus a dirty grill is more likely to break down and cost you replacement fees. That’s why we recommend clean the grill grates after every use, taking special care to remove any food debris from eating away at the metal parts within. It’s as easy as leaving the grill on high for about 15 minutes to burn off organic matter, then using a grill brush to scrub all the ashes away.Periodically cleaning your grill inside and out is just as important, but it’s not necessary after every cookout. Depending on how frequently you grill, you can perform a deep clean every 2–3 months or at the end of every season to root out any harmful grease or mold. Shop Grill Cleaning Tools

Enjoy Yourself!
Few things bring us as much joy as coming home and grilling for family and friends. It should always be the same for you, even if those sear marks don’t come out just right or if you have to deal with a flare-up or two. You can follow every one of our tips exactly as stated, but what we want you to remember most is that grilling should mean good times with good people.Want to make those good times even better? Check out the many grilling and barbecue recipes we offer, then sharpen your skills with our how-to articles and videos. We’ll see you in the backyard.


